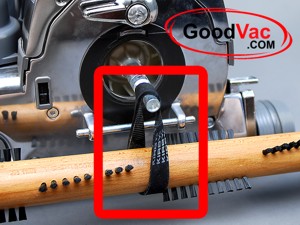
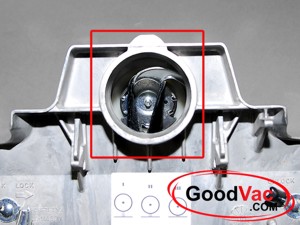
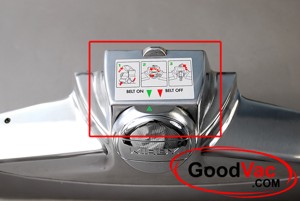
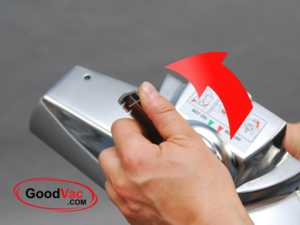
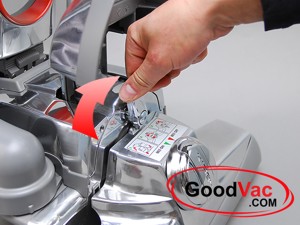
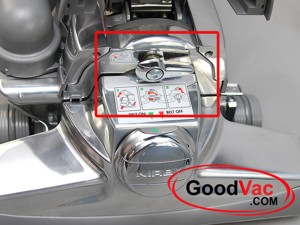
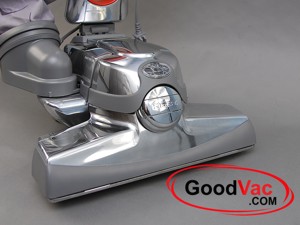
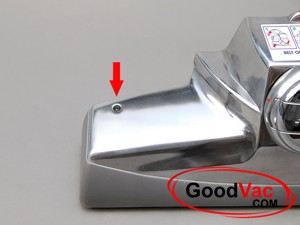
1.3.0 - Attaching the nozzle and belt installation

Disclaimer:
Goodvac.com is not affiliated with The Kirby Company and/or The Scott Fetzer Company. All manuals and maintenance tips for Kirby vacuum cleaners and repair manuals for Kirby model vacuums are authored by GoodVac.com and are not endorsed or approved by the Kirby vacuum manufacturer - Kirby Company and/or The Scott Fetzer Company. These materials should be only used at your own discretion and risk. .
Read our "Terms of Use".

BACK to "Standard set user manual"
1.3.1 - Attach nozzle to Kirby vacuum
Goal installing belt

1.

This is how the brush roll is engaged with the motor shaft when it is properly installed. (Just pretend that you can see through metal and this is how it would look inside the nozzle.)

nozzle ready to be attached
2.
This is how belt is positioned on the metal hook inside the nozzle before the nozzle is attached to the Kirby vacuum.
* If this is exactly how it looks in your Kirby vacuum nozzle, you can skip to Step #3
Kirby nozzle green arrows 3.
Step 1 - position knob on the Kirby nozzle so green arrows line up(Belt On). Check inside the nozzle and make sure that the belt is on the brush roll positioned right in the middle of it.
Kirby nozzle knob 4.
Step 2 - Twist the nozzle COUNTERCLOCKWISE

When twisting the knob, the metal hook inside the nozzle has to go THROUGH the belt and as you keep twisting it has to stretch the belt. You will feel some resistance, but keep going until the red arrows (Belt Off) line up.
Kirby nozzle ready 5.
Now it should look just like this.
Kirby nozzle red arrows 6.
Red arrows matching (Belt Off).
raise Kirby nozzle 7.
Step 3 - Raise front of the Kirby vacuum all the way up
Kirby nozzle mold hooks 8.
The two hooks on the nozzle casting must go on the ends of the bar on the fan casing on the front of the Kirby vacuum.
press Kirby nozzle to unit 9.
Now press the nozzle to the unit
lock the nozzle 10.
And lock it with the latch
twist Kirby nozzle handle 11.
Twist the knob back to line up green arrows (Belt On)

Kirby nozzle installed 12.
Now you are DONE.
Nozzle is locked onto the unit. Knob and label green arrows are lined up.
Ready to vacuum 13.
Now lower headlight cap and you are ready to vacuum.
brush indicator location 14.
When vacuuming, green indicator light should glow green. That means that the brush roll is spinning.

If light is blinking while vacuuming, you may have to install a new belt. Over time, rubber stretches and the belt may start slipping when bristles meet resistance from carper fibers. Usually this is accompanied by the smell of burning rubber. Slipping may also be caused by something spilled on the carpet. Do not vacuum rugs if they are wet.

Light is NOT on = belt is broken.
You also may have purchased the wrong brush roll or your Kirby vacuum nozzle is from another model and the indicator light is on the opposite side. In this case do not start swapping plastic brush ends so you can install brush roll reversed just to make the light work. Brush roll bristles are at a certain angle and have to brush the carpet towards the center of the nozzle. If you flip the brush roll it will be brushing carpet toward the edges of the nozzle and it will not perform its best.
more tips

15.

Light is NOT on - most likely the the belt is broken.

Magnet in the brush has to pass over the coil inside the nozzle and that produces just enough electricity in the coil to turn light on (a small power plant inside the nozzle, if you will :-).


1.3.2 - Properly install brush roll and belt (back to TOP)
Kirby brush roll is made to last for many years. More than likely it will last you 2-3 times longer than other brand vacuum brush rolls.

The down side is that brush roll installation is a bit more complicated and you MUST learn and how properly install the brush roll.

Sooner or later you will have to do it as you will have to remove brush roll to change the belt.
rugplate latch 16.
Unlock BOTH latches holding bottom nozzle plate in place. Sometimes they are corroded so you may have to use pliers.
Remove the rugplate 17.
Remove the rug plate.
Pull the brush roll out. If it does not come out pull it by the belt. Just slide the belt to one of the ends and pull. If the belt is broken - use a rope, rag or a sock - get it around the brush roll and PULL. If the brush end caps come off - install them back immediately so you don't accidentally swap them.
put in the kirby brush rol 18.
Now slide a new Kirby belt onto the brush roll.
brush roll end cap 19.
From here it gets a bit tricky so read carefully:
Brush roll axis is NOT at the center of the end cap and it makes a big difference how you position the end caps when installing the brush roll back into the nozzle.
various positions 20.
Brush roll can be installed and used in 3 different positions.
When the brush is new it is installed in the position NR1. This number can be found on the plastic end of each cap and has to be facing the bottom of the nozzle (it will face the carpet when vacuuming).
brush roll explained 21.
New brush roll installed in position "1" bristles will stick out of the nozzle by about 1/8 of an inch or 3 millimeters. If you install a new brush in position "2" or "3", bristles will be digging into the carpet too deep. Your Kirby will be jumping and excessively vibrating plus brush roll will wear out fairly quickly.

If you bought a used Kirby vacuum with a used brush roll you may have to play with the brush roll a bit until you get it installed correctly. Depending on how much the brush is worn it may have to be installed in positions 1; 2 or 3. Bristles should stick out between 1/8" and 1/32" (3 mm and 1mm ).

When bristles are too short they will not agitate the rug and vacuuming will not be as effective as it could be.
Tilted kirby brush 22.
If you fail to match end cap numbers the brush roll nozzle will be tilted at an angle. Kirby will tend to jump and will keep going to the left or to the right all the time. Brush roll will wear out quickly and unevenly.
endcaps match 23.
So now that you have BOTH end caps with same number facing you and belt through the middle of the brush you can install the rug plate - metal nozzle frame on the bottom.
installing rugplate 24.
To do that - first have rug plate edge go over 2 protrusions on the nozzle casting
locking the rugplate

25.

Now just lock it on the nozzle with 2 latches.
If by now you forgot how to put the nozzle on the unit just go back to TOP of this page :-)

Happy vacuuming !!!