Tools:
- Cutting Pliers
- Open end wrench 3/8 inch or 10mm
- Less than 1/6 (4mm) diameter pin (a nail will do)
- T15 torx screwdriver (older Kirby vacuums - Phillips screwdriver)
- T20 torx screwdriver (older Kirby vacuums - Phillips screwdriver)
- Flat screwdriver
- Phillips screwdriver
- Knife
|
|
Just like in many cases in life there are more than 1 way of accomplyishing the same result. Same here - some prefer getting the whole motor out of the housing. This leaves front fan case glued to the housing so no need to mess with silicone sealants. However in the process other problems may arrise from imporoperly installed motor and perhaps not properly seated transmission. We suggest opening the fan case and not getting the motor out.
|
|
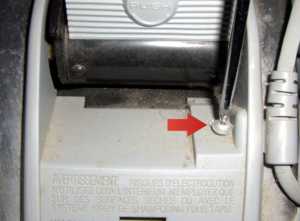
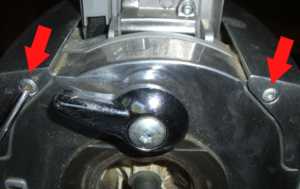
1.
Remove scuff plate screw
(Kirby parts number 233506S) holding the cord clip (T15 torx screwdriver or Phillips screwdriver on older models)
|
|
2.
Remove scuff plate bottom screw
(Kirby parts # 233405S) (T20 torx screwdriver or Phillips screwdriver on older models)
|
|
3.
Put the flat screwdriver through the opening and push it down thus releasing a latch inside so you can take the
scuff plate off.
|
|
4.
Remove 2 rear
cover shell screws(Kirby part # 232495S ) (T20 torx screwdriver or Phillips screwdriver on older models)
|
|
5.
Remove 2 front
cover shell screws (Kirby part # 232395S ) (T20 torx screwdriver or Phillips screwdriver on older models)
|
|
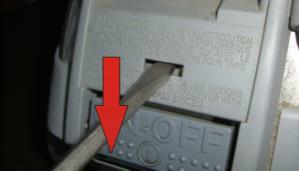
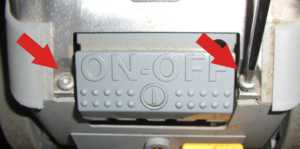
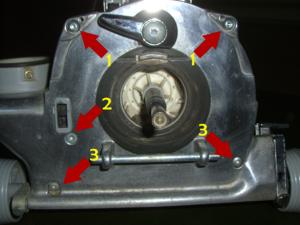
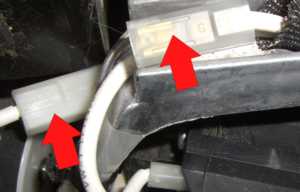
6.
Remove screws holding
fan case:
Marked with "1" - 2 Screws on the top (Kirby parts number 231595S)
Marked with "2" - 1 Screw near the switch (Kirby parts number 234998S)
Marked with "3" - 2 Screws on the bottom (Kirby parts number 234898S)
(T20 torx screwdriver or Phillips screwdriver on older models)
|

|
7.
Fan case is glued so you may need to use flat screwdriver to prey it off. The best place is a bit above the exhaust.
|
|
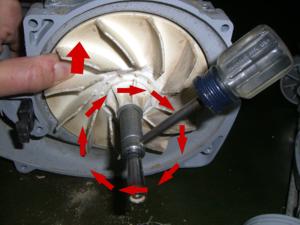
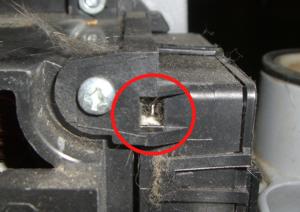
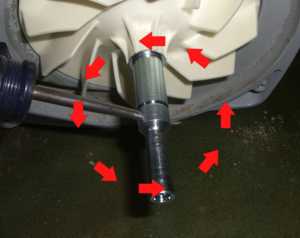
8.
Sometimes it is possible to replace Kirby vacuum
fan without further disassembly of the Kirby vacuum. It is worth trying:
Put a pin through the hole in the shaft
Press the plastic fan blade to the Kirby with your thumb as strong as you can
Turn the shaft CLOCKWISE !!! (this is a reverse thread)
If it worked - skip all the way to fan installation and assembly. If you could not take the shaft off follow all steps.
|
|
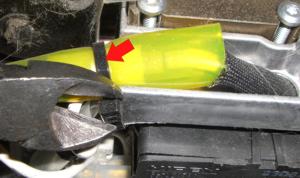
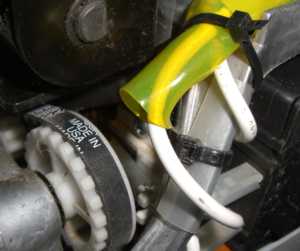
9.
Cut the cable tie that holds vinyl tubing protecting wires to headlight.
|
|
10.
Disconnect headlight wire that was protected with the tubing.
|

|
11.
Remove 2 rear
slide bracket screws (Kirby part # 232495S) (T20 torx screwdriver or Phillips screwdriver on older models)
|
|
12.
NOTE !!!
When removing slide bracket with the headlight you will have to disconnect second headlight wire. make note where it is so you can find it when assembling it back. It is very easy not to notice this "well hidden" connector.
|
|
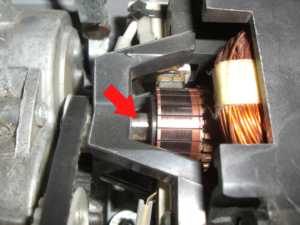
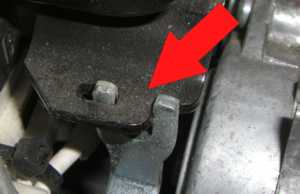
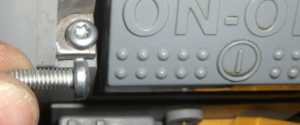
13.
Now you have gained access to the rear of the
Kirby motor. You will notice that the shaft behind the commutator is machined so it can be held with an open end (3/8 inch or 10mm) wrench

|
|
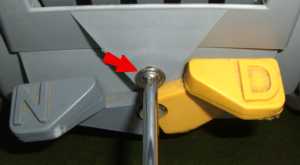
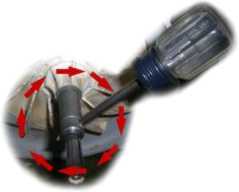
14.
Now - hold the armature with the wrench and turn the shaft CLOCKWISE.
|
|
15.
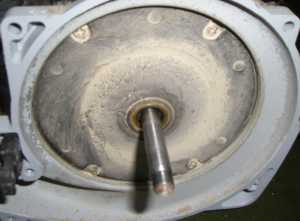
Under the fan you will find some dust. It is not necessary to clean it but if you will - DO NOT spray or otherwise let any cleaning chemicals or water get into the front Kirby motor bearing. Spray the cleaning solution onto the rag or paper towel and just wipe the dust off.
|
|
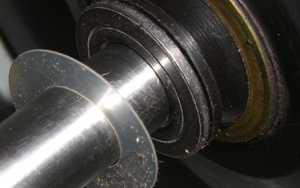
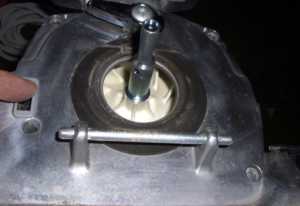
16.
Install the Kirby fan spacer with the seal (seal first and spacer through the seal) and them the plastic Kirby
fan washer
|
|
17.
Slide the
fan onto the shaft and then the metal Kirby fan washer.
|
|
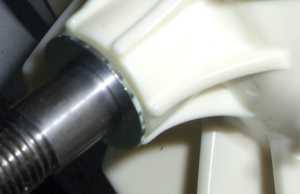
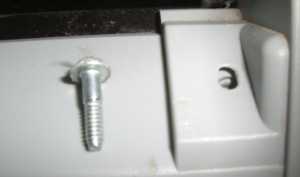
18.
Now install the shaft by turning it COUNTERCLOCKWISE (reverse thread). If you holding the shaft with a wrench - do not over tighten it.
|
|
19.
Use a knife to remove the old sealant from the fan casing and the frame around the motor.
|

|
20.
Install the Kirby slide bracket with headlight by plugging the long headlight wire back. If you can not find where to plug in - see step #12
|
|
21.
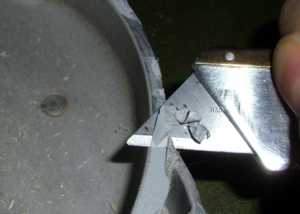
Make sure this is how
handle pivot spring assembly is connected to the Kirby transmission.
|
|
|
22.
Put the rear screws in but do not tighten them yet
|
|
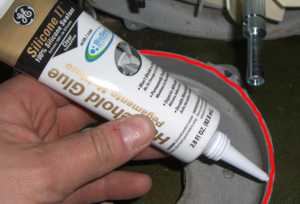
23.
Put a bead of silicone sealant around the entire perimeter of the fan case.
DO NOT use a permanent glue as you may need to remove the fan case some time in the future. Purpose of the sealant is to SEAL not to GLUE the fan case to the Kirby vacuum body.
DO NOT put sealant in the screw holes as if it will get on the screw thread it may make it very hard to take screws out in the future.
|
|
24
Hold Kirby motor unit vertically and lower the fan case with sealant carefully in place. Try avoid moving the fan case on the Kirby main body as it may scrub the sealant on the edges of the fan case.
Put the screws in. Get all of them in (or at least 2) while holding the Kirby vertically. Tighten them.
|
|
|
25.
Now tighten the rear screws holding rear of the headlight cap and slide bracket assembly.
|
|
26.
Slide the vinyl sleeve onto the second headlight wire connector, connect the wires and tie them to the frame with a cable tie. You want to keep all wires clear of the Kirby transmission gears so they will not get damaged while vacuuming.
|
|
|
27
Put in back 2 front cover shell screws
(Kirby part # 232395S ) (they have pointy end and are cone shaped at the bottom)
(T20 torx screwdriver or Phillips screwdriver on older models)
|
|
28.
Install 2 rear cover shell screws
(Kirby part # 232495S ) (T20 torx screwdriver or Phillips screwdriver on older models)
|
|
29.
Scuff plate / Cord clip screw
(Kirby parts number 233506S) holding the cord clip (T15 torx screwdriver or Phillips screwdriver on older models)
(do not forget to put cord clip under the scuff plate)
|
|
|
30.
Scuff plate bottom screw
(Kirby parts # 233405S) (T20 torx screwdriver or Phillips screwdriver on older models)
|
|
CONGRATULATIONS - YOU ARE DONE
|